 Learn how to create an awesome denim texture in the GIMP!
Note: This tutorial has been written by fence-post and republished here with his permission. The original can be viewed here
I've gotten a lot of positive feedback on this tutorial and thought I would share it here. Finally got around to adding the second part where I discuss adding seams, wrinkles, threads. Enjoy!
If you don't have your own scanline pattern used for this tutorial, you can download one here:
Just download the pattern, extract it to your GIMP patterns folder (typically somewhere like this on your hard drive: C:\Program Files\GIMP-2.0\share\gimp\2.0\patterns), then either start up GIMP or hit the refresh button in your Patterns Dialog Window to access it.
Step 1
Open up a new GIMP document and fill the background layer with a blue color. Choose any blue that you want. I used 2B6C7E.
 Step 2
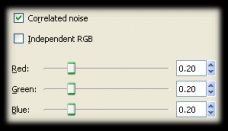
Now, on this layer, let's add some noise. Go to Filters | Noise | Scatter RGB...and use the following settings:
Step 3
Add a transparent layer above your background and fill it with your scanline pattern (the scanline pattern is included in the tutorial zipfile). Because the scanlines are difficult to see, I'm not going to give you a screenshot for this step.
Step 4
Let's add some texture by using the Bump Map tool.
With you background layer selected, go to:
Filters | Map | Bump Map... and use the following settings. Make sure you select the scanline layer as the bump map. These are the settings that looked most realistic to me.
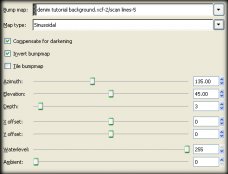 Experiment to see if you find something you like better.
Step 5
Now, turn off your scanline layer (or delete it if you don't need it anymore.)
Step 6
I like to go back to Step 2 and add more noise at this time, but it's not required.
Here's my result:
Step 7
With your denim layer in place, add a new layer and fill it with black. On this new layer, make a selection along the edge for a seam and fill it with white. The image below shows the selected area highlighted in red and already filled with white. Obviously, your selected area won't be red. I've done this for demonstration purposes only.
Step 8
The purpose for this layer will be to give our denim the appearance of a raised seam, which will be accomplished through the Bump Map Menu. Before we proceed with that however, let's blur the interface between the white and black just a bit.




 Education in its broadest, general sense is the means through which the aims and habits of a group of people lives on from one generation to the next. Generally, it occurs through any experience that has a formative effect on the way one thinks, feels, or acts. In...
 English is a West Germanic language spoken originally in England, and is now the most widely used language in the world. It is spoken as a first language by a majority of the inhabitants of several nations, including the United Kingdom, the United States, Canada...