 by rocket
Sometimes, when we want to add some textures using of Brush, some of us are creating and save in Define Edge Preset to make a new brush. Then it’s time to brush the in the skin and combing a few adjustments and changing of Blend Modes to make it realistic. But here in this written Photoshop tutorial, there is one process or way on how to add a skin texture with easy and simple ways to finish the activity. So what are waiting for? Get ready your Photoshop. Let’s get started!
Tutorial Details
- Apps Used: Adobe Photoshop CS6
- Difficulty: Beginners/Intermediate
- Estimated Completion Time: 8-10 minutes
 This is the final result.
Step 1.
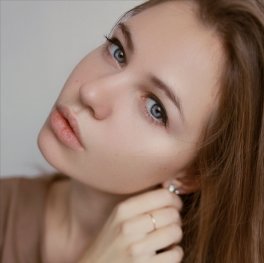
Open any images you want to try in this tutorial
This is the image that I will use for this tutorial, it is owned by NerySoul that you can download this in Deviantart. As you can see in her skin texture, skin color and having a little bit texture in her face are pretty awesome. So here, we will add some texture in her skin to look a little bit rough.
Step 2.
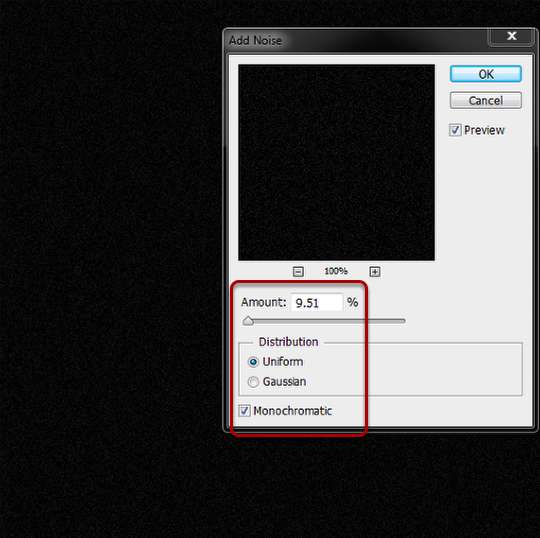
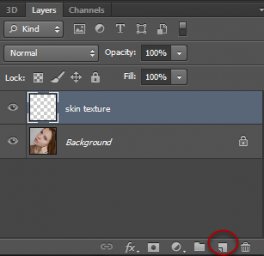
Create a new layer and use Paint Bucket Tool
This time we need to create a new layer to apply and form noise filter later. You can hit the button below of the layer list like what’s inside of the red circle on the screenshot below or just press Ctrl + Shift + N (WIN) / Cmd + Shift + N (MAC) for keyboard shortcut. Right after that, rename the layer “skin texture“.
Then right after that, use Paint Bucket Tool ( for keyboard shortcut). The Paint Bucket Tool fills adjacent pixels that are similar in color value to the pixels we click but this tool cannot be used with images in Bitmap mode.and paint it in the new layer with color #000000 (BLACK). Adjust the color in the foreground and set the color # in 000000 to see and use the Black color.
Source: designerstuts.com
More about Photoshop tutorial Adding texture to skin
Transparent gif
by cdubIn photoshop, keep selecting all the background until you have all of you want to be transparent...Try deleting background and see if the underlying backgroundis already transparent. (If your final image is easy to select, select it directly.). If initially selecting the BACKGROUND, and you need to get a transparent bckgrnd, inverse the selection so the main subject is selected. You may already have a Transparent background (you'll see the checkerboard).
If you don't already have an underlying transparent background, Copy the selected imaged.
Open new file, with Transparent background

|
Adobe Photoshop Instruction for Fashion Retouching Training DVD - by Kristina Sherk Tutorial Video
Software (MyFotoSource Adobe Photoshop)
- High-end retouching techniques from the best in the industry!
- Learn the secrets to produce stunning images
- Lessons include; Removing blemishes, learn how to get nice smooth skin without loosing texture
- Cleaning up hair and evening the tones
- Reshape bone structure, adding digital makeup, and clean up eyes the natural way
|
CorelDRAW X7 review: Customizable features make this robust design program .. — PCWorld
.. purchase, as well as a $25 monthly subscription. People miffed by Adobe's wholesale move to subscriptions will find a great alternative here. ..
Galaxy 61 Delivers Show Open for VH1's 'The Fabulous Life — Animation World Network
VHI recently called upon Galaxy 61 to create a show intro for the new 2014 season of The Fabulous Life, the hit series that reveals the extravagant places, possessions and pastimes of pop-culture's most famous celebrities. The Brooklyn-based ..
Hunterdon County Polytech students bridge the gap thanks to local Rotary Clubs — Hunterdon County Democrat
This year's Job Fair, on March 25, attracted the Dave Gansfuss Allstate Agent for an agency logo; G&H Publishing and author Katherine Kurz for children's book illustrations; Artiste Salon for a new logo, brochure and social media materials; St.
FAQ
PHOTOSHOP HELP PLEASEEEE!?
It's this very picture on her opening page: http://www.chila-kumari-burman.co.uk/ - It's not the little pictures, I'd just like to know how she makes the big picture black, toned and transparent. Please help! It's for my GSCE Art final design. Thanks.
Very simple to do, its basically black background layered, textured wrapped effect with some transparency,. Look for some good tutorials:
 by rocket