 The IPL season is on and I’ve seen many YouTuber users trying to take smart advantage of it by making dedicated IPL channels. For all such YouTuber users, here is a treat for you from TheDesignBlitz. I’m gonna show you how to create a custom YouTube channel background without taking much time and drain any money. You can use the super handy free photo editing tool – GIMP and a pinch of creativity.
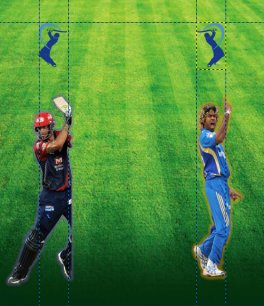
The image above shows what would be the end result of this tutorial. I suggest you do it alongside the tutorial. If you happen to do something wrong, just undo it (ctrl+z). You can see the YouTube Channel background live in action here – custom YouTube background using GIMP
 Gist of this GIMP tutorial
I have used four images in this tutorial. One is the grassy background, two players and the IPL logo.
I cropped the players and IPL logo using the ‘lasso select’ tool from other images. I’m assuming you have these four images ready with you.
I then marked grids on the background which guide me where to place the players and other objects.
Then the other images are imported and placed as desired.
Lets get going …
Steps to make a YouTube background in GIMP
Step 1.
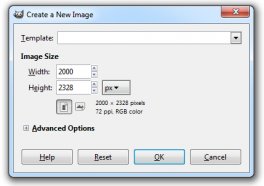
 Open a new file (Ctrl + N) with width 2000 and height 2328.
Step 2.
Drag the grass image into the GIMP interface.
It opens in a new layer with the image’s file name. In my case its grass-background.
Step 3.
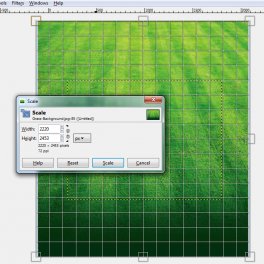
Resize it using the scale tool in the toolbar ( to find the tool, hover the mouse pointer over the various tools and see the tool name below the pointer) such that it fills the full canvas ( I mean the full background).
Step 4.
We now need to mark the area that goes behind the content ( invisible part). So that we know where we need to add images, channel name, logos, etc.
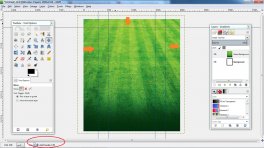
 For that we use the grids. We need to drag 5 grids. Two on either sides of the image and one on the top .
Drag the 1st vertical grid from left to 300 ( u can see the grid count at the bottom left of Gimp UI).
Drag the 2nd vertical grid from left to 519, 3rd vertical grid from left to 1479, the 4th vertical grid from left to 1700.
Drag 1st horizontal grid from top to 174.
The part of the image the comes between 1st and 2nd, the part that comes between 3th and 4th grids and the part the comes before the horizontal grid is the area of the image that will be visible in the channel. All of the rest will be invisible behind the channel’s content. Hence we must place all the stuff that you want to display in that portion of the image.
Step 5.
Make a new layer by pressing Shift+ Ctrl+ N and name it ‘Nothing’. This layer will have the part of the image that goes behind the channel content ( the invisible part) which must have nothing. Hence the name.
Step 6.
Select ‘rectangle select’ tool from the tool box and select innermost rectangle formed by grids by dragging the clicked mouse.
Step 7.
Select the bucket tool from the tool box, set the foreground color to any color. In my case its gray. Using the bucket tool fill the selected rectangular area.
Step 8.
Drag Malinga ( or whichever player image you got) to the GIMP interface from your computer. It opens in a new layer ( with the name of the image file. Its Malinga for me). Re-size the image using the scale tool from the tool box.


