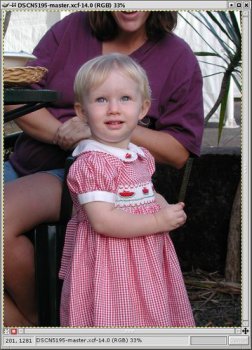
 My original image, loaded into The GIMP.
You will need to make a layer mask for the part(s) of the image that you want to replace with a new background.Here is the mask that I created for this image in my simulating shallow depth of field tutorial. You might want to go off and read that now if you need help creating one.
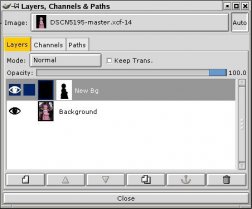
Open the Layers dialog and make sure that the original image is listed in the drop-down box. Right-click on the Background layer and select New Layer (there is also a button for this in the bottom button bar of the Layers dialog.Here I named the new layer “New Bg”. It doesn’t matter what you choose for the fill.
Now right-click on the New Bg layer and select “Add Layer Mask”.
 In the Add Mask Options dialog, select white (Full Opacity) and click OK.
In your image window you should now see only the isolated subject, surrounded by the fill of the New Bg layer.
 Now it is simply a matter of pasting your new background into the New Bg layer, or creating a new one. Here I’ll show you how to mimic a background you see in a lot of portraits.In the GIMP toolbox, set the foreground and background color swatches to the light and dark end colors for a gradient background. You set the color by clicking on a swatch icon and using the color editor to select a color. Alternatively, you can open the Palette dialog, choose a color palette and pick two colors from that.
In the GIMP toolbox, double-click the Blend (gradient) tool to bring up the Tool Options dialog. Choose Gradient type “Radial”.In the Layers dialog, click on the image thumbnail for the New Bg layer to select it instead of its layer mask.
Go back to the image window, click down in the center of the subject and drag out towards an edge. A gradient should fill the background. If you don’t like the effect, Undo (Ctrl+Z) and try again or change your colors.
Consider adding some fog.Here I duplicated the New Bg layer so I have the same layer mask and the fog only shows up in the background. For fog I simply ran a Filter/Render/Plasma, desaturated it, put the layer in Overlay mode and reduced the layer transparency to about half.


