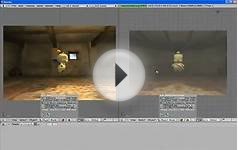
On the right is the original photo, of a building in Brussels, Belgium. On the left is the result after some hours of Photoshop by an amateur shopper such as me. You can click the images to see larger versions.
The major differences in the two photos are:
- The edited image is much more detailed, especially the sky and its reflection. The texture of the clouds is now much more prominent and rich. Little of this texture is visible in the original photo, and it might even be hard for the uninitiated to believe that this texture information was at all contained in the original photo. But it was, and such information always is, and with some practice it can very easily and quickly be recovered and enhanced in Photoshop for a much richer look. The human eye gorges on detail. Give it as much as you can.
- The image is much more colourful. The sky is much more vibrant, the clouds have a warm tinge, and the building itself has exploded into green and blue, very little of which is visible in the original photo.
- The sun shining off the glass panels of the building is much more prominent.
- Overall, a semi-realistic, computer-game style vibrance and brightness has been added to the photo, and the relative drabness of the original photo is completely gone.
The question now is, how were these results achieved?
I said at the outset that this is not a full-fledged tutorial, because a step-by-step instruction will be too arduous for me to write and probably pretty fruitless to blindly follow. A lot of editing comes from hunches, intuition and experimentation (which grows the intuition), so I would not encourage anyone to do exactly what I did. However, I could outline the general procedures I used.
Source: blog.abhranil.net
More about Image texture Analysis tutorial
Transparent gif
by cdubIn photoshop, keep selecting all the background until you have all of you want to be transparent...Try deleting background and see if the underlying backgroundis already transparent. (If your final image is easy to select, select it directly.). If initially selecting the BACKGROUND, and you need to get a transparent bckgrnd, inverse the selection so the main subject is selected. You may already have a Transparent background (you'll see the checkerboard).
If you don't already have an underlying transparent background, Copy the selected imaged.
Open new file, with Transparent background
blender tutorial: texture
Blender for Beginners 14th Tutorial (Low Poly Character ...

|
Introducing ZBrush
Book (Sybex)
|
CorelDRAW X7 review: Customizable features make this robust design program .. — PCWorld
.. purchase, as well as a $25 monthly subscription. People miffed by Adobe's wholesale move to subscriptions will find a great alternative here. ..
Galaxy 61 Delivers Show Open for VH1's 'The Fabulous Life — Animation World Network
VHI recently called upon Galaxy 61 to create a show intro for the new 2014 season of The Fabulous Life, the hit series that reveals the extravagant places, possessions and pastimes of pop-culture's most famous celebrities. The Brooklyn-based ..
Hunterdon County Polytech students bridge the gap thanks to local Rotary Clubs — Hunterdon County Democrat
This year's Job Fair, on March 25, attracted the Dave Gansfuss Allstate Agent for an agency logo; G&H Publishing and author Katherine Kurz for children's book illustrations; Artiste Salon for a new logo, brochure and social media materials; St.
FAQ
Old paper effect on Paint.Net?
I just want to make all photo colors to become a little more brown. Is there a way to do it with paint.Net? What tool should I use to do it? (It should be possible to make it green or blue the same way)
The Sepia Effect may work, but try some adjustments using the Hue/Saturation Tool under Adjustments menu. Might help:
How to Make Old, Dirty Paper Effects with Paint.NET: Tutorial by Magistrate: Hard Stone; Crumpled Paper; Burning Coals + Planet Texture!: